Choose a cursive model, try a six-letter first lesson, and find practice for letters, joins, words and passages. The guided lesson below teaches i, u, t, n, m and a; the alphabet resources show additional reference shapes, rather than step-by-step formation lessons for every letter.
Choose where to start
Choose by the task that is unfamiliar, rather than an age, fixed number of days or a requirement to finish print first. If identifying the letter itself is difficult, name and compare it with an adult before trying its movement.
- I know the letter’s name but have not written it in cursive. Start with the six-letter first lesson. Watch one body stroke and any lift, then choose tracing or copying.
- I want to check a finished shape. Use the uppercase and lowercase chart. It is a reference, not instructions for moving your pencil.
- I know the two letters but lose them at a join. Compare the connected in / it / at models below, then choose connection practice for known letters.
- I can join familiar letters and want longer writing. Choose word and sentence models or the paragraph practice method.
Choose a model and read its guides
This unit uses our original cursive-starter-v1 movement convention. Its arrows follow the same center paths shown in the printable lesson. The Prima Cursive chart and other practice packs show a separate reference model; some entries and exits differ. Follow your teacher’s convention when it differs.
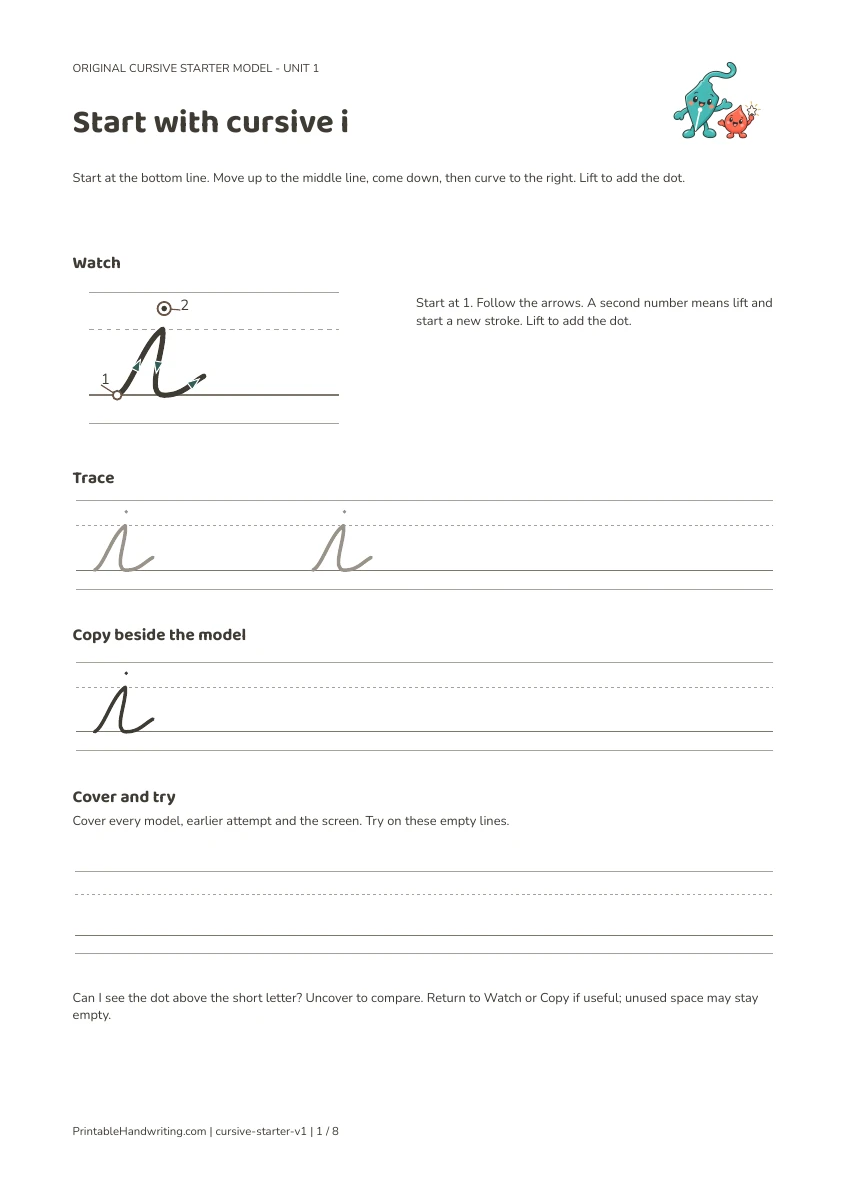
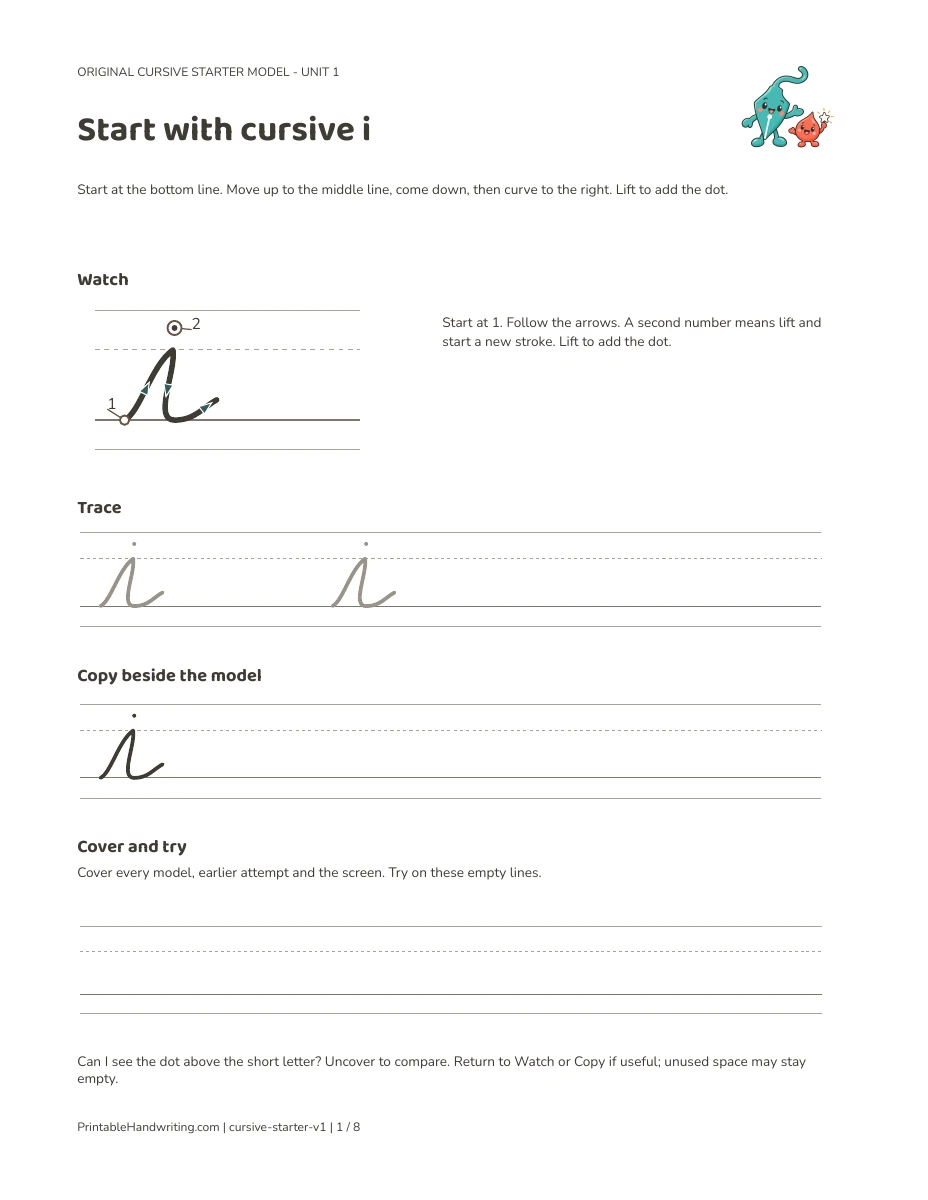
The darker line is the writing line. The dashed guide marks short-letter height; the upper guide gives room for taller strokes. For i, start at 1 on the writing line, rise to the dashed guide and return down. Finish the body before lifting to add the dot at 2. A second starting number means a separate stroke, not a second letter.
Compare u with n: u has two turns along the bottom, while n has a rounded arch at the top. The m model adds another top arch. Keep these identities visible before adding more text.
Try your first six letters
An adult can demonstrate slowly while reading the steps. Watch once, then choose a little tracing or copying. Cover every model and earlier copy for a model-free try. If it is difficult, uncover the model or return to the demonstration; you do not need to fill a page or meet a pass mark.
1. Start with cursive i
Start at the bottom line. Move up to the middle line, come down, then curve to the right. Lift to add the dot.
Remember: Lift to add the dot.
Check one thing: Can I see the dot above the short letter?
2. Try cursive u
Start at the bottom line. Move up, come down and curve up again. Come down once more and finish to the right.
Remember: Keep the two turns connected.
Check one thing: Can I see two clear curves at the bottom?
3. Add cursive t
Start on the writing line. Rise above the short-letter guide, come down and curve right. Lift, then add the cross-stroke.
Remember: Lift after the body to cross the t.
Check one thing: Can I see the cross-stroke without closing the letter?
4. Try cursive n
Start on the writing line and rise to the short-letter guide. Come down, rise over one rounded arch, then finish to the right.
Remember: The rounded arch is at the top; compare the bottom turns in u.
Check one thing: Can I tell n from u?
5. Add cursive m
Start as for n. Make a rounded arch, then a second rounded arch before finishing to the right.
Remember: Compare two rounded arches in m with one in n.
Check one thing: Can I tell m from n?
6. Try cursive a
Rise from the writing line to the upper right of the round body. Curve left, down and around to close it. Come down its right side and finish with an exit to the right.
Remember: Close the body before making the downward stroke and exit.
Check one thing: Is the body closed, with a clear exit?
7. Write your first words: in, it, at
The next letter shares the connected body: the connecting stroke rises directly into the next letter rather than stopping and adding a separate entry. Complete the whole body first, then lift for a dot or cross-stroke. On page 7, trace if useful, copy with the models visible, then cover the models and your copies before trying again.
Write the joined body of in without lifting between its letters. Lift at the end to dot the i.
Write the joined body of it without lifting between its letters. Lift at the end to dot the i. Lift after the body to cross the t.
Write the joined body of at without lifting between its letters. Lift after the body to cross the t.
8. Try new words with the references covered
Page 8 offers an, am and mat. Watch, trace or copy above its fold line if useful. Fold that entire upper area back and hide the screen. The lower area contains only print word prompts and empty guides. Cover each new attempt before trying another; unfold afterwards and compare just one letter identity or join. If you need help, go back to that letter’s page.
Reveal the cursive reference for an, am and mat
Close this reference and cover earlier writing for an independent attempt.
Continue with letters, joins and words
In in, the body of i continues into n before the dot is added. If the n becomes hard to identify, practise its arch on its own, then retry the connection. A clearer single letter is a useful return point; simply adding more words may hide the problem.
- More letter shapes: the one-page chart is for lookup; the 26-page alphabet pack adds copy rows. Neither supplies step-by-step formation for the other 20 letters.
- More joins: once you know the individual shapes, use connection models and practice. Follow the model’s actual entry and exit, rather than forcing one height on every join.
- Words and sentences: after familiar joins, the 8-page Flow pack provides models and blank copy rows.
- Longer text: the paragraph method and six-passage pack are for people who already recognize letters and common joins.
- Your own text: use the Cursive worksheet generator. A font model does not add stroke-order instruction.
Check one thing and choose the next practice
For a letter, ask whether you can identify it without guessing from the word. For a join, ask whether both letters remain recognizable. Compare the same word with the same model, guides and comfortable pace when checking another attempt. These checks guide the next practice; they are not a diagnostic score or evidence of guaranteed improvement.
Use baseline and reassessment for a repeatable comparison, or the handwriting self-check to choose one visible feature. Blank practice paper gives room for an independent attempt.
Inside the printable lesson
Both files contain the same eight-page sequence. Choose your paper, print portrait at Actual size / 100%, and check the preview. Every page includes Nib and Dot outside the writing area.
- Start with cursive i
- Try cursive u
- Add cursive t
- Try cursive n
- Add cursive m
- Try cursive a
- Write your first words
- Try new words
Frequently asked questions
Do I need to finish print handwriting before cursive?
There is no universal print-first requirement. Choose a meaningful task and a model you can identify with help. If letter identity is unfamiliar, name and compare the shapes with an adult. This lesson teaches six cursive letters; it is not a reading course or a complete alphabet curriculum.
Which cursive model does this lesson teach?
The demonstrations use PrintableHandwriting’s original cursive-starter-v1 movement convention. The separate Prima Cursive chart shows reference outlines, whose entry strokes and exits can differ. Follow the model used by your teacher when it differs; no single convention is presented as universal.
When should I lift my pencil?
In these models, finish a letter’s main body before lifting to dot i or cross t. In the joined words, finish the connected body first, then add the dot or cross-stroke. Numbered starting places show separate strokes; arrows follow the original center paths.
What should I cover for an independent try?
Cover every cursive model and all your previous attempts, including the screen. On page 8, fold the upper reference and practice area back at the marked line; write from the print word prompts below. Cover each new attempt before trying another. Uncover afterwards to compare one feature. If you need a model again, return to Watch or Copy.
Does this guide teach every cursive letter?
No. Its first unit teaches lowercase i, u, t, n, m and a, then in, it, at, an, am and mat. The chart and 26-page alphabet pack show other finished shapes for reference and copying, not their full formation instruction. Additional letters need their own demonstration before unfamiliar joins or longer text.