Quick Answer
When should you use tracing versus copying for handwriting practice?
Tracing reduces the demand of producing a shape from memory, so it can help a learner notice size, position, and movement while a model is visible. Copying adds recall, spacing, and self-monitoring because the writer must reproduce the model on a blank line. A useful progression is not “trace forever” or “never trace”: use tracing briefly for a new or unstable pattern, then move to copying and one independent attempt as soon as the form remains recognizable.
A common frustration among handwriting learners is the tracing illusion: writing looks clean and flawless while tracing dotted guides, but disintegrates the moment the pen moves to a plain ruled page.
Tracing and copying are not interchangeable tools. They engage entirely different motor control circuits in the brain. Tracing provides continuous physical constraints, acting like training wheels on a bicycle; copying forces the writer to pull a visual memory into working memory, plan coordinates on a blank baseline, and execute an unguided stroke.
Making real progress requires knowing what each drill makes easier, what it hides, and exactly when to remove the visual guides.
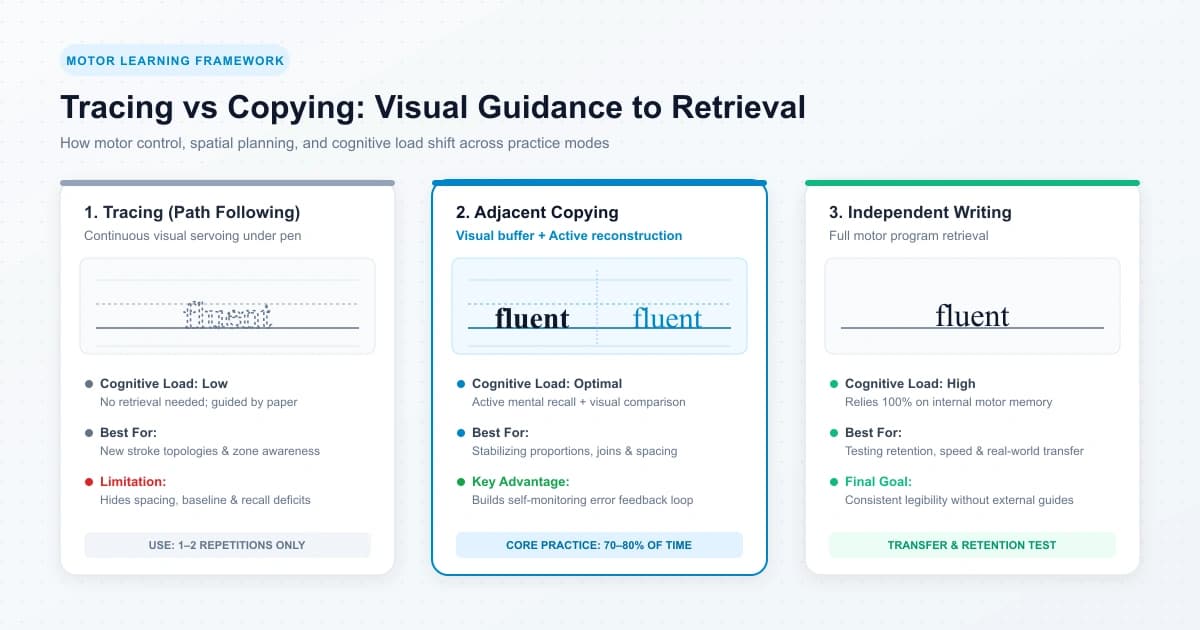
What is the practical difference between tracing and copying?
The practical difference lies in path following versus visual reconstruction. When tracing, the target path is physically printed beneath the pen tip. When copying, the model sits adjacent to the writing line, requiring the writer to translate visual information into an autonomous motor command.
In motor learning research, this distinction is known as the Guidance Hypothesis (Schmidt & Lee, 2019). High levels of physical guidance help a learner produce the correct movement immediately, but prevent the nervous system from learning how to detect and correct its own errors.
| Practice Mode | Model Position | Cognitive Task | Primary Limitation |
|---|---|---|---|
| Tracing | Directly under the pen tip (dotted/faded lines) | Visual alignment; tracking along visible boundaries | Hides spacing, starting point, and memory deficits |
| Adjacent Copying | Next to or above the blank line | Working memory retrieval; coordinate mapping | Requires stable foundational fine motor control |
| Independent Writing | No model present (recall from long-term memory) | Automated motor program execution | Errors can become ingrained without self-checking |
When can tracing be useful?
Tracing is a temporary scaffold. It is valuable when introducing an unfamiliar letter topology, feeling an unintuitive cursive join, or understanding how letter components relate to guideline zones such as the ascender line and baseline.
Specifically, tracing serves three clear functions:
- New Stroke Topologies: When an adult learns cursive or italic connections for the first time, forms like the high entry stroke of b, v, or w can feel counterintuitive. Tracing 2–3 repetitions allows the hand to experience the stroke geometry before attempting it in free space.
- Guideline Height Awareness: For early learners or writers switching to a new ruling, tracing visualizes where ascenders (h, l, k), descenders (g, p, y), and short lowercase bodies (a, c, e) fit relative to the midline.
- Interrupting Entrenched Motor Habits: If a writer has spent decades forming o with an upward, clockwise motion that jams cursive exits, directional tracing with arrow cues can physically interrupt the old motor reflex.
Once the movement path is understood, tracing has finished its job. Continuing to trace past this stage yields diminishing returns and builds false confidence.
What can tracing hide?
Tracing masks spatial planning, starting coordinate selection, and baseline stability. Because the lines on the paper dictate where the pen starts, stops, and turns, the writer never practices making those spatial calculations independently.
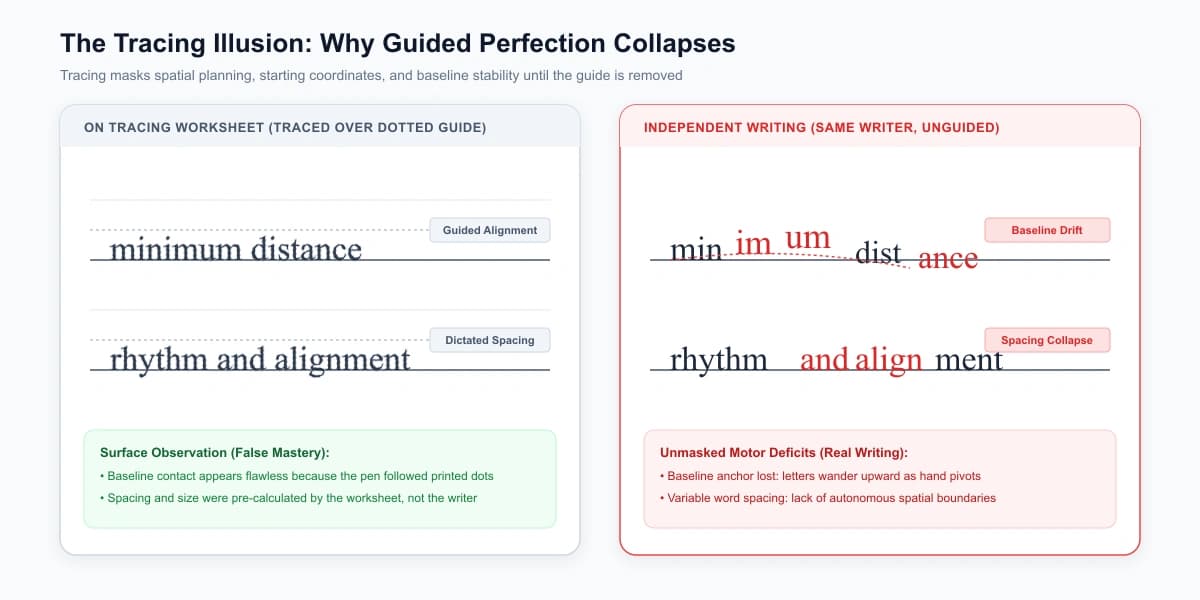
Research on retrieval practice (Karpicke & Roediger, 2008) shows that the brain consolidates motor and cognitive skills through active retrieval, not passive matching. Tracing creates three distinct blind spots:
- No Starting Point Decisions: On a blank line, the writer must decide where to place the pen relative to the previous letter. Tracing provides this anchor automatically, leaving writers unprepared for managing consistent word spacing.
- Suppressed Natural Fluency: To stay strictly inside dotted lines, the writer must use slow, tense, high-friction finger movements. This prevents developing the relaxed, rhythmic wrist and forearm movement necessary for sustained writing speed.
- Absence of an Error-Feedback Loop: In copying, the writer observes deviations between their attempt and the model. In tracing, deviations are perceived merely as “slipping off the track,” which provides little observable feedback for correction.
When should practice move to copying?
Practice should transition to copying the moment the writer can recognize the stroke sequence of the target letter without looking at an arrow chart. This transition should happen within minutes, not weeks.
The most effective structure is the 1-Trace + 1-Copy + 1-Check micro-cycle:
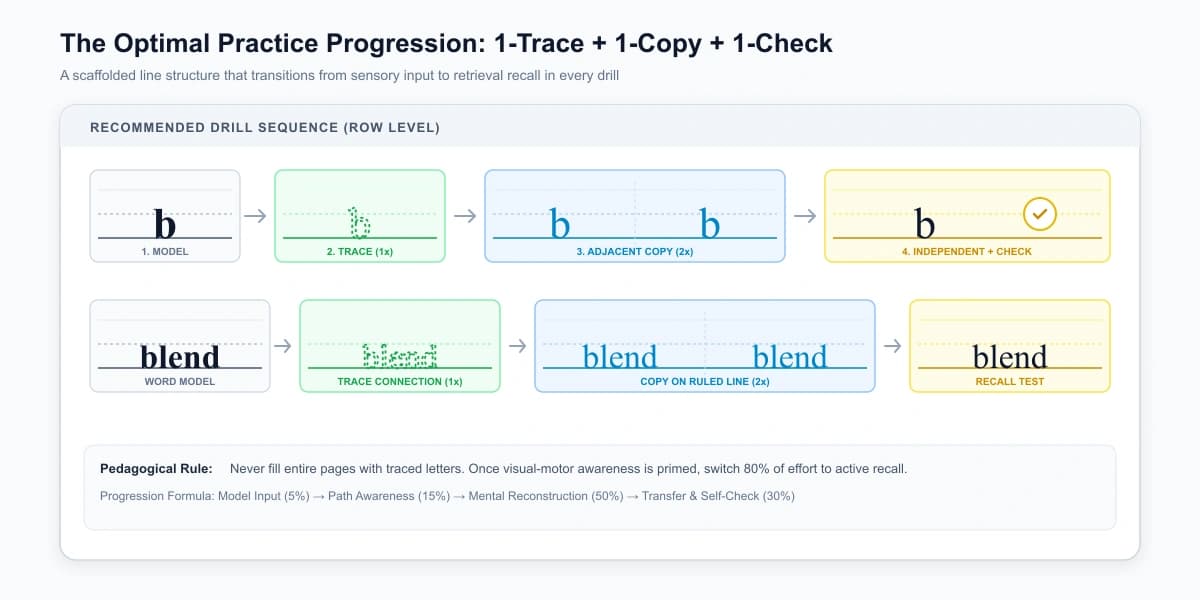
- 1 Trace (Input): Trace the shape once slowly to feel the vertical height, baseline contact, and turning points.
- 1 Adjacent Copy (Retrieval): Shift your eyes to the adjacent blank space and reproduce the shape without a dotted guide, relying on your working memory.
- 1 Independent Check (Feedback): Pause for 3 seconds. Compare your copied letter to the original model on the left, circling the single largest discrepancy (such as an incomplete closure or uneven slant).
If the copied attempt is completely unrecognizable, perform one more trace before copying again. If the copy is recognizable, do not trace again on that row—complete the remaining repetitions as adjacent copies.
How should Copy mode be used without turning into mindless repetition?
Copying can easily degenerate into mindless mechanical filling if writers copy their own previous mistake rather than the original model. To maintain high information gain, apply three deliberate practice rules:
1. Isolate One Variable Per Set
Do not try to fix slant, letter size, baseline alignment, and pen pressure simultaneously. Dedicate a short set of 4–5 repetitions to a single target:
- Set 1 (Baseline stability): Ensure every lowercase letter firmly contacts the baseline without dipping below.
- Set 2 (Counter clarity): Ensure letters like a, e, o, d keep their internal loops clean and open.
- Set 3 (Uniform slant): Check whether vertical stems remain parallel to each other.
2. Eliminate the “Photocopier Effect”
When writing a row of letters, humans naturally tend to look at the letter they just wrote rather than the original model on the far left. If copy #2 has a 5% flaw, copy #3 will copy that flaw, magnifying the error across the line. Before every single stroke, glance back at the original printed model.
3. Quality Over Page Volume
Handwriting motor control fatigues rapidly. Five focused, evaluated attempts produce significantly greater neural adaptation than fifty rushed repetitions across a crowded page.
Does the progression change for adults and early learners?
Yes. The progression differs because the underlying neurological constraints are different. Young children are developing fine motor control and visual-motor integration (Feder & Majnemer, 2007), whereas adults already possess mature motor control but must unlearn decades of automated motor habits.
For Early Learners
Young children benefit from larger line heights (such as 0.65-inch Wide ruling) and slightly more tactile or visual guidance. However, continuous tracing should still be minimized. Encourage games like “Look, Cover, Write, Check” to introduce retrieval early and prevent passive tracing habits.
For Adult Learners
Adults have strong spatial comprehension and should skip heavy tracing almost entirely. One or two traced samples are sufficient to calibrate movement paths on a new font style. Adult practice should prioritize adjacent copying, immediate self-evaluation against a structured rubric, and testing transfer in real-world writing tasks.
If you are an adult focusing on print legibility, start with a reviewed resource such as the Adult Print Legibility Foundations Pack, which organizes exercises into clear model-and-copy progressions. If you need customized vocabulary or specific sentences, configure a custom layout using our print worksheet generator.
How can you choose a worksheet mode?
Select your worksheet mode based on your current practice bottleneck rather than arbitrary page counts. Use the following decision matrix:
| Diagnostic Symptom | Recommended Mode | Recommended Guide | Mode Distribution | Next Step Gate |
|---|---|---|---|---|
| Unfamiliar stroke path or join | Tracing Mode | Four-line with slant guide | 30% Tracing / 70% Copying | Can execute correct stroke direction without hesitation |
| Known shape, but size and baseline wander | Adjacent Copy Mode | Four-line or Three-line (0.50 in) | 10% Tracing / 90% Copying | Letter bodies consistently touch midline and baseline |
| Letters neat individually, but words crowd together | Short Word Copy Mode | Midline-only or Three-line | 100% Copying (words) | Inter-word spacing equals width of lowercase “o” |
| Clean on worksheets, messy on plain notebook paper | Independent Recall Drills | Step down: Three-line → Single Line | 100% Unguided Writing | Writing remains legible at normal conversational speed |
For an objective baseline assessment before adjusting your practice routine, you can run a free sample through our AI handwriting analysis check to pinpoint whether your primary bottleneck is baseline consistency, letter closure, or rhythm.
Frequently asked questions
Is tracing harmful for handwriting?
Tracing is not harmful when used as a brief introductory orientation. It becomes counterproductive only when used as the sole method of practice, as it prevents the development of autonomous spatial planning, motor recall, and self-correction.
How many times should I trace a letter before copying?
One to three times is usually sufficient. Once your hand has felt the stroke sequence and turning points, switch immediately to adjacent copying on a blank line.
Why do my letters tilt when I stop tracing?
When tracing, the printed font enforces vertical or slanted angles for you. When writing unguided, hand and wrist pivots naturally introduce slant drift. To stabilize slant during unguided copying, keep the paper rotated at a consistent angle (around 20–35 degrees for right-handers, 35–45 degrees for left-handers) and pull downstrokes toward your torso.
Sources & References
Details the Guidance Hypothesis: excessive continuous physical guidance assists immediate performance but degrades long-term retention and autonomous motor retrieval.
Demonstrates that active memory retrieval produces substantially greater retention and transfer compared to passive recognition or guided restudy.
Analyzes the role of visual-motor integration in handwriting and how scaffolding must be systematically faded to foster independent letter production.
Investigates the interplay between visual feedback and proprioception during fluent handwriting versus slow, visually-guided tracing.