Quick Answer
How do you teach letter formation?
Choose one letter and a clear model that fits the learner’s school. Show where to start, move slowly along its path, and explain when to lift the pencil. Offer a little tracing or copying if useful, then cover every example for an independent try. Compare one visible feature, demonstrate again when needed, and stop before the activity becomes a page-filling task.
This activity is for an adult helping a preschool or kindergarten learner form one useful letter. Have paper, a comfortable writing tool and, if you want a printed model, the guided lowercase pack. Keep a spare sheet for covering examples. A worksheet is optional: an adult can demonstrate on plain paper too.
1. Choose a letter and a model
Choose a letter the learner can identify with support, perhaps one in their name. This guide follows lowercase a from start to finish. These are the actual original print shapes used in the guided pack:
Compare these shapes with the school’s model, particularly a, g and t. Follow the classroom version when it differs. A finished shape shows what a letter looks like; movement cues show where the pencil starts, which way it travels and when it lifts. A dotted font alone does not supply that information.
Utah UURC’s formation suggestions illustrate another specified convention: its a uses a different sequence from this guide. A difference between conventions is not, by itself, a mistake. Keep one model clear during the current activity.
2. Show where the movement starts
Point to the starting dot at the upper right of a’s round part. Write the letter where the learner can see your hand and pencil. Use the same short words as the model while you move:
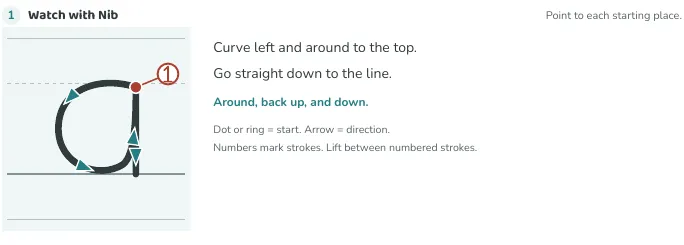
- Curve left and around to the top.
- Go straight down to the line.
Say “Around, back up, and down.” Follow the curve back to its starting place before going down the right side to the darker writing line. This a is one continuous stroke: the two instruction sentences do not mean two strokes. The pencil finishes at the bottom of the right-hand line.
Reading Universe’s teaching guidance describes showing the movement while using brief directional language. The paths and illustrations here are our own; its charts are not reproduced. In this pack, numbers mark separate strokes: lift between numbered strokes, not at every arrow.
3. Use a short trace and copy practice
Open the guided lowercase formation pack. Choose Guided letter formation and print page 1 for a, on A4 portrait paper at Actual size / 100%. The complete file has 26 pages, one per lowercase letter. Choose a useful page; a–z is the file’s lookup order, not a required teaching sequence.
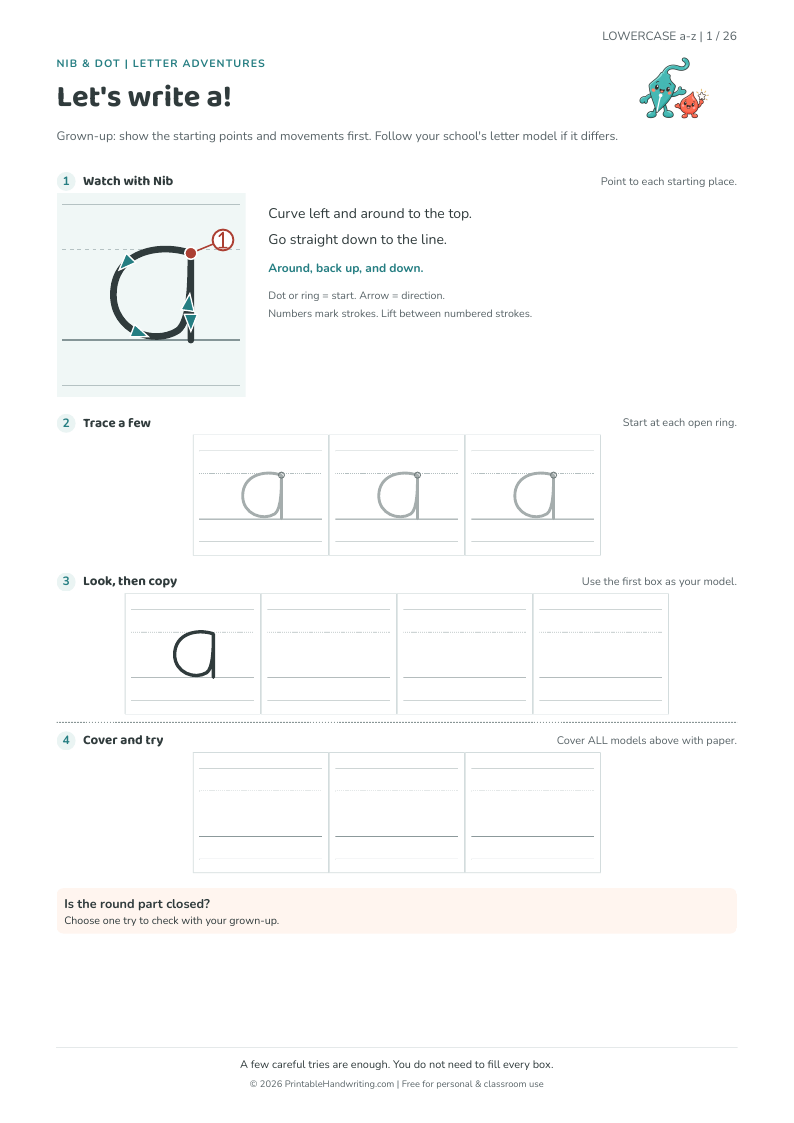
In Trace a few, start at an open ring and follow a gray model. There are three available models; choose only as many as help. In Look, then copy, use the first box as the visible model and try a letter in an empty box. There is one model and three blank Copy boxes. You can skip tracing, return to a demonstration, or stop after one attempt.
4. Cover all the examples and try
Place spare paper over every model above the dashed cover line: the large Watch model, all three tracing models and the first Copy box. Leave the three empty Cover and try boxes below that line visible. If you have other model pages nearby, turn them face down too.
Invite one a in any of those empty boxes without looking at a model. Uncover the page afterward and compare together. This is an opportunity to see what help to offer next, not a test score. If it feels too difficult, show a again or keep the model visible for another Copy attempt. Unused boxes can stay empty.
5. Notice one feature and add help if needed
Ask “Is the round part closed?” Point to where the curve meets at the top. If there is a gap, demonstrate that meeting place again rather than judging the whole page for neatness. The examples below are deliberately drawn teaching comparisons, not samples of a child’s writing. Each pair changes one feature of this model.
a: Close the round part
Feature is clear
Show it again
Check together: Is the round part closed?
i: Place the dot above the line
Feature is clear
Show it again
Check together: Is the dot above the straight line?
- 1. Draw a short line down.
- Lift. 2. Add a dot above it.
k: Join the slants to the tall line
Feature is clear
Show it again
Check together: Do both slanting parts meet the tall line?
- 1. Draw a tall line down.
- Lift. 2. Slant in to the middle, then out and down.
y: Continue below the writing line
Feature is clear
Show it again
Check together: Does one slant continue below the line?
- 1. Slant down to the middle.
- Lift. 2. Slant in, then keep going below the line.
For i, the lift separates the line from its dot. For k, lift after the tall line, then draw both slants as one continuous second stroke. For y, the two slants meet on the darker writing line; the second continues below it. The word “middle” in y’s movement cue means that joining place, not the dashed height guide above it. Find i on PDF page 9, k on page 11 and y on page 25.
If the feature is unclear, return to the corresponding demonstration or a visible Copy model. If the learner wants to finish, stop and leave the page for another time. These comparisons help choose the next explanation; they do not diagnose a writing difficulty or establish that learning has occurred.
6. Use letter groups when they fit the model
With these models, c, a and d share a leftward curved movement; l, i and t include a downward line. These similarities can help an adult explain a familiar movement. Their starting heights, lifts and added parts still differ: d has a separate tall stroke, i has a dot, and t has a crossbar. Relay’s formation guidance discusses using relevant similarities and comparing examples. These two groups are illustrations, not a universal teaching or phonics order.
Return to the useful task: try the letter in a name, revisit the same model, choose another letter, or stop. The Name Worksheet Generator lets an adult enter the learner’s own name; the name-writing activity explains how to use it with a meaningful purpose.
For familiar letter shapes, the Alphabet Tracing Generator offers Full A–Z or Selected letters in your chosen order. Choose Preschool letter formationfor these original lowercase models or the guided uppercase models, with starting points, arrows and four small practice steps. Choose Lowercase, Uppercase or Both, then A4 or US Letter in Tall orientation. Both gives each selected letter an uppercase page followed by a lowercase page. Standard keeps the font and ruled-practice options. Select the layout and settings yourself after opening the tool. For a different school model, use an appropriate example rather than changing a child’s name or calling the school’s shape wrong.
Frequently asked questions
Where should a child start writing a letter?
Use the starting place on the chosen model and demonstrate the movement. In this guide’s a, start at the upper right of the round part, curve left and back to the top, then move down the right side. Other letters have their own starting places; not every lowercase letter starts at the top writing guide.
Is there one correct letter shape or stroke order?
Schools and print styles can use different shapes and movement sequences. This guide demonstrates one original print convention. Compare it with the learner’s classroom model, and follow that model when it differs. A different convention is not an error simply because it differs from this page.
What if the child can trace but cannot write the letter alone?
Return to an adult demonstration or copy one letter with the model visible. Offer the help that makes the next attempt manageable, or stop. For an independent attempt, cover the large model, every tracing model and the Copy model. More tracing pages are not a required response.
Should we teach uppercase or lowercase letters first?
Choose a letter needed for the current task and coordinate with the school’s approach. A name may need a capital and lowercase letters together. This lesson uses lowercase a as its worked example; it does not establish a universal uppercase-first or lowercase-first sequence.
Sources & References
Supports explicit demonstration with brief movement language. Its teaching charts are not reproduced here, and it does not evaluate this pack or its number of boxes.
An example of specified starting places, directions and lifts. Some sequences, including a, differ from the original model used in this guide.
Supports explicit modeling, comparing examples and organizing practice around relevant similarities. This lesson does not adopt its age or clinical claims.